ClassifyIt Shell Extension – Beta Version – Admin Guide
Release Note: The ClassifyIt Shell Extension has reached Beta status (stable testing). THIS IS NOT the final version and SHALL NOT BE USED OPERATIONALLY.
Functional Overview
| The ClassifyIt Shell Extension (Alpha) provides a Windows Shell Extension with an additional context menu to select and see the classification of a file, and adds Icon Overlay to graphically show the classification of the file. |
|
Icon Overlay
|
Icon Overlay provides the graphical representation of the files classifications. Example: the result might look like this. In Explorer each classified file receives a graphical representation of its classification if form of a coloured stamp. Here file a1.txt would represent an UNCLASSIFIED file, shown with a black stamp. File a2.doc is a RESTRICTED file, represented with a green stamp, etc. |
|
Context Menu
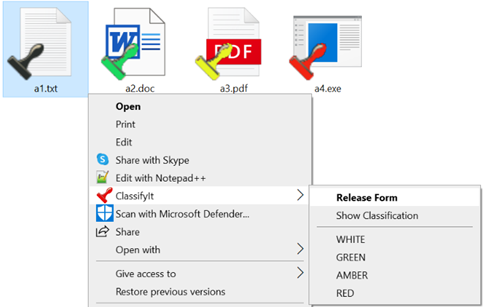
| With a right click on the file icon the ClassifyIt context menu is visible and offers a set of commands. To see and change the file classification. This example is based on the TLP classification and marking schema, and would be adopted to the use-case of your company. |  |
Installation Instructions
The installation of the ClassifyIt Shell Extension in its Beta version provides a setup for installing and uninstalling ClassifyIt Shell Extension.
Windows Shell Extensions as provided by ClassifyIt, require normally a reboot, once when installing and once when uninstalling.
The Setup program overcomes this, however there is a bit of interaction required. All Explorer Windows have to be closed. This results in the effect that also the Desktop disappears (the Desktop is part of Explorer). Starting an Explorer will also reactivate the Desktop. Unfortunatelly when doing this in the Setup program, it does not restart the Desktop. Therefore some limited user interaction is required. Detailed informaiton is given during the install/uninstall procredures.
The easiest procedure is the following:
- start a CMD window;
- run the Setup program and ignore the indication to start a TaskManager;
- finish the Setup program;
- ALT-TAB to your CMD window;
- enter: explorer
-- this will automatically restart the Desktop
Test Guidance
In Explorer navigate to any folder where you have full access rights - the shell extension requires write access rights.
Right click on any file and see the ClassifyIt menu.
Note: with Windows 11 the context menu of Explorer became a ‘modern’ look. You only see the ClassifyIt item if you press the SHIFT key while right-clicking, or when selecting Show more options.
In the ClassifyIt menu you can select the classification directly by selecting one of the TLP classifications: WHITE, GREEN, AMBER or RED.
- in final version this will fully align with the ClassifyIt Office Add-On
When selecting WHITE the file-icon will be overlayed with a black-coloured stamp. GREEN, AMBER and RED with their colours.
INFO: if the one or other stamp is not visible, the cause is in the limited amount of Overlays Windows allows being used. Already OneDrive uses 7 overlays. This shell extension uses 4.
SOLUTION: Windows uses a priority schema, with a final prioritisation taking the alphabetic order in the Registry. Open the Registry Editor and open the key Computer\HKEY_LOCAL_MACHINE\SOFTWARE\Microsoft\Windows\CurrentVersion\Explorer\ShellIconOverlayIdentifiers - rename keys (F2) by removing their leading spaces. Leave the ClassifyIt_U, ClassifyIt_R, ClassifyIt_C, ClassifyIt_S as they are. Confirm with F5 (reload) that the ClassifyIt_ keys are at the top.
The ClassifyIt menu can be used for a single file, or a selection of multiple files. If you select a Directory, all files and sub-directories will be applied with the selected classification.
The Release Form menu option will open a form/window to select a classification and also a release could be selected.
The Show Classification menu shows for the selected file(s) the classification
The Remove Classification menu removes all classification tags from the file, although it does not look like. Press F5 aftewards, which refreshes the Explorere window.
Removal Instructions
To deinstall the ClassifyIt Shell Extension execute the following steps:
- open the CMD command line interface in admin mode;
- Windows key + I to open Settings and click Apps
- Select ClassifyIt Shell and uninstall
- ALT-TAB to the CMD window - start explorer
